Build a Multiplexed LED Display Driver

Introduction
Driving a Single Display Digit
Driving a single 7-segment LED display requires several things to be in place before something is actually displayed.
- A micro-controller or some other application relevant data source to apply pre-encoded information a 7-segment display driver.
- A 7-segment display driver to apply the encoded data to the display,
- At least seven current limiting resistors (one for each segment of the display), that will be connected from the display driver to the display,
Multiplexing
These requirements apply to only one display and are necessary to only display one digit. What if your display required 6 digits, however (in the case of a clock)? Would you then need 6 data sources, 6 display drivers, and 42 resistors? Not if you use multiplexing. Using this technique, the number of digits in your display is readily scaleable. In fact, the incremental increase in part count for each additional display is only two (the display, and the driver transistor). Thus, instead of requiring 54 driver components for a six digit display, you will only need:
- One data source (micro-controller)
- One display driver
- Six small driver transistors
- Seven current-limiting resistors
Demo Circuit
For our breadboard example, and in the interest in putting the entire circuit on one breadboard, you see how a 3-digit display is designed using multiplexing. The display-specific part of the circuit will use:
- One data source (a counter)
- One display driver,
- Three driver transistors
- Seven current-limiting resistors
Demo Circuit Topology

Theory of Operation
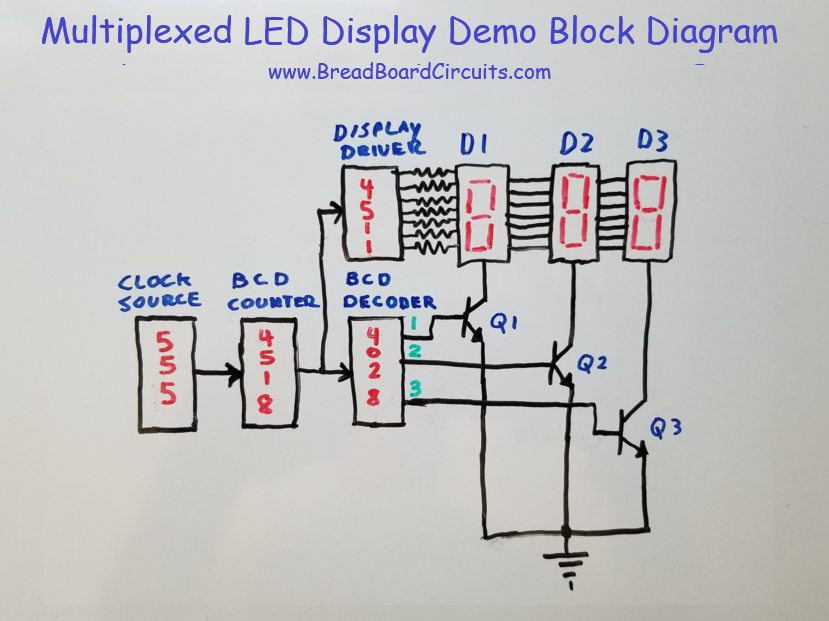
Referring to the block diagram above, the demo circuit works as follows:
- An adjustable frequency clock source (555 timer) supplies a clock signal to the BCD (Binary Coded Decimal) counter (CD4518).
- The BCD counter outputs a binary count that is reset when it reaches a binary 0100 (or decimal four). This causes it to count to three and then start over.
- The output of the BCD connected to both the 7-segment display driver (CD4511), and a BCD decoder (CD4028).
- The 7-segment display driver outputs decoded data to the LED displays. All LED displays are simultaneously connected to the output of this display driver.
- The BCD to decoder sequentially enables output pins that correspond to “1”, “2”, or “3”. These outputs will drive the base of their respective driver transistor.
- Each driver transistor enables the display it is connected to.
- As the system counts, and the number “1” is outputted from the display driver, only LED segment #1 is “turned on” by its transistor. Whenever one digit is turned on, the other two digits are turned off. On the next clock count, the number “2” is outputted and display #2 is “turned on”, and then so on.
- The result is that each display segment will display its own number “1”, “2”, and “3” sequentially.
- When the adjustable clock source is clocking slowly, you can see each number turn on and off individually.
- However, when you reach a certain frequency, it appears that all LED segments are turned on and you see “123”, all at once. Although in reality, all segments are not on at the same time, the persistence of our vision causes us to perceive that they are. Another way to look at it is that the frequency response of the LEDs is much greater that than that of our vision.
Supplies Needed
- Minimum breadboard equipment (see here)
- (1) 10k potentiometer
- (7) 1k ohm 1/4 watt resistors
- (3) 10k ohm 1/4 watt resistors
- (1) 150 ohm 1/4 watt resistor
- (3) 2n3904 transistors
- (4) 0.1 uF mylar capacitors
- (1) 22 uf 16v electrolytic capacitor
- CMOS Integrated Circuits (see here for recommended CMOS IC kit)
- (1) 4028 CMOS decade counter IC DIP16
- (1) 4518 CMOS BCD counter IC DIP16
- (1) 4511 CMOS 7-Segment Display IC DIP 16
- (1) 555 timer DIP 8 (see here for recommended analog IC kit)
- (3) 7-Segment Displays Common Cathode (see here for recommended LED display kit)
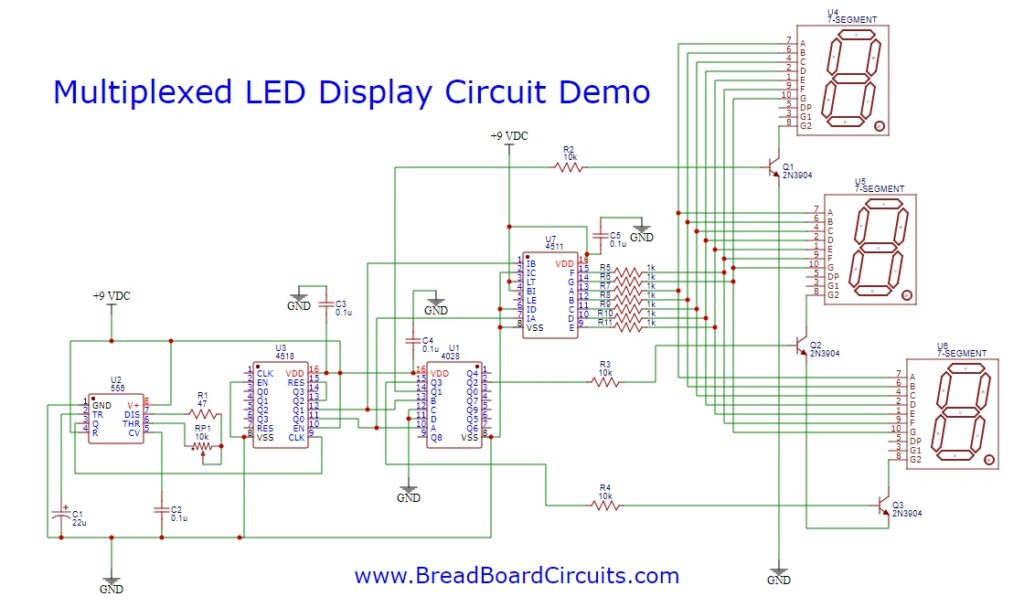
Schematic of the Multiplexed LED Display Circuit

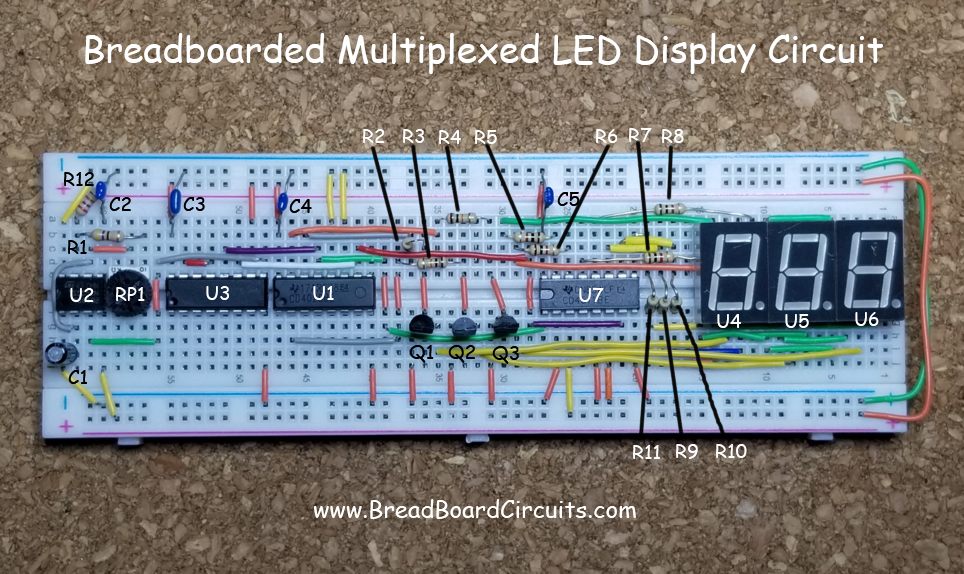
Multiplexed LED Display Breadboard Layout
If you would like to construct and test the demo, a picture of the breadboarded circuit, along with its component reference, is shown below. Please note that this breadboard was constructed with “no room to spare”. Try placing the components as shown so that you won’t run out of room on the breadboard.

Project Video
Conclusion
Multiplexing LED displays uses the persistence of human vision to make all digits appear to be “on”, whereas only one digit is actually “on” at any given moment. This fact allows designers to use only one display driver, instead of a display driver for each digit. This greatly saves on part count, complexity, and circuit real estate.
For a better experience building breadboarded circuits, please see our page detailing the minimum recommended lab equipment for your electronics bench. Also, don’t forget to review the recommended safety procedures to follow when building and testing breadboarded circuits.
Finally, for other interesting breadboarded circuits please visit the home page here or our YouTube channel here. SM
We are a participant in the Amazon Services LLC Associates Program, an affiliate advertising program designed to provide a means for us to earn fees by linking to Amazon.com and affiliated sites.
